Ubuntu中部署Docker Registry与Docker Registry UI
内部DevOps环境,一般需要部署私有的Docker Registry服务,避免打包的镜像需要上传到公网,加速私有服务容器的部署。
本文使用独立的Ubuntu Service 18.04服务器提供Docker registry服务,使用80与443端口。使用Nginx接入Docker registry与registry-ui的流量,均使用Docker容器提供服务(Everything in Docker)。
准备数据与配置文件目录:
sudo mkdir /mnt/data-registry
sudo mkdir /opt/nginx
准备Nginx配置文件/opt/nginx/nginx.conf:
### nginx config

events {
    worker_connections  1024;
}

http {

  upstream docker-registry {
    server registry:5000;
  }

  upstream docker-registry-ui {
    server registry-ui:80;
  }

  ## Set a variable to help us decide if we need to add the
  ## 'Docker-Distribution-Api-Version' header.
  ## The registry always sets this header.
  ## In the case of nginx performing auth, the header is unset
  ## since nginx is auth-ing before proxying.
  map $upstream_http_docker_distribution_api_version $docker_distribution_api_version {
    '' 'registry/2.0';
  }

  server {
    listen 80 default_server;
    listen 443 ssl http2 default_server;
    server_name  _;

    # SSL
    ssl_certificate     /etc/nginx/conf.d/certs/_.qinzhiqiang.cn.crt;
    ssl_certificate_key /etc/nginx/conf.d/certs/_.qinzhiqiang.cn.pem;

    return 301 https://registry.qinzhiqiang.cn$request_uri;
  }

  server {
    listen 443 ssl http2;
    server_name registry.qinzhiqiang.cn;

    # SSL
    ssl_certificate     /etc/nginx/conf.d/certs/_.qinzhiqiang.cn.crt;
    ssl_certificate_key /etc/nginx/conf.d/certs/_.qinzhiqiang.cn.pem;

    # Recommendations from https://raymii.org/s/tutorials/Strong_SSL_Security_On_nginx.html
    ssl_protocols TLSv1.1 TLSv1.2;
    ssl_ciphers 'EECDH+AESGCM:EDH+AESGCM:AES256+EECDH:AES256+EDH';
    ssl_prefer_server_ciphers on;
    ssl_session_cache shared:SSL:10m;

    # disable any limits to avoid HTTP 413 for large image uploads
    client_max_body_size 0;

    # required to avoid HTTP 411: see Issue #1486 (https://github.com/moby/moby/issues/1486)
    chunked_transfer_encoding on;

    location /v2/ {
      # Do not allow connections from docker 1.5 and earlier
      # docker pre-1.6.0 did not properly set the user agent on ping, catch "Go *" user agents
      if ($http_user_agent ~ "^(docker\/1\.(3|4|5(?!\.[0-9]-dev))|Go ).*$" ) {
        return 404;
      }

      # To add basic authentication to v2 use auth_basic setting.
      auth_basic "Registry realm";
      auth_basic_user_file /etc/nginx/conf.d/nginx.htpasswd;

      #limit_except GET HEAD {
      #    auth_basic "Registry realm";
      #    auth_basic_user_file /etc/nginx/conf.d/nginx.htpasswd;
      #}

      ## If $docker_distribution_api_version is empty, the header is not added.
      ## See the map directive above where this variable is defined.
      add_header 'Docker-Distribution-Api-Version' $docker_distribution_api_version always;

      proxy_pass                          http://docker-registry;
      proxy_set_header  Host              $http_host;   # required for docker client's sake
      proxy_set_header  X-Real-IP         $remote_addr; # pass on real client's IP
      proxy_set_header  X-Forwarded-For   $proxy_add_x_forwarded_for;
      proxy_set_header  X-Forwarded-Proto $scheme;
      proxy_read_timeout                  900;
    }

    location / {
      auth_basic "Registry realm";
      auth_basic_user_file /etc/nginx/conf.d/nginx.htpasswd;

      proxy_pass                          http://docker-registry-ui;
      proxy_set_header  Host              $http_host;   # required for docker client's sake
      proxy_set_header  X-Real-IP         $remote_addr; # pass on real client's IP
      proxy_set_header  X-Forwarded-For   $proxy_add_x_forwarded_for;
      proxy_set_header  X-Forwarded-Proto $scheme;
      proxy_read_timeout                  900;
    }
  }
}
其中的 /opt/nginx/nginx.htpasswd 生成方法, 参考 https://www.digitalocean.com/community/tutorials/how-to-set-up-password-authentication-with-nginx-on-ubuntu-14-04 。
准备好TLS证书文件/opt/nginx/certs/_.qinzhiqiang.cn.crt与/opt/nginx/certs/_.qinzhiqiang.cn.pem。
启动服务(Everything in docker):
# -p 127.0.0.1:5000:5000
docker run -d \
  -e REGISTRY_STORAGE_DELETE_ENABLED=false \
  --restart=always \
  --name registry \
  -v /mnt/data-registry:/var/lib/registry \
  registry:2

#  -p 127.0.0.1:5100:80
docker run -d \
  -e URL=https://registry.qinzhiqiang.cn \
  -e DELETE_IMAGES=false \
  --restart=always \
  --name registry-ui \
  joxit/docker-registry-ui:static

docker run -d \
  -p 80:80 \
  -p 443:443 \
  --link registry:registry \
  --link registry-ui:registry-ui \
  --restart=always \
  --name nginx \
  -v /opt/nginx:/etc/nginx/conf.d \
  -v /opt/nginx/nginx.conf:/etc/nginx/nginx.conf \
  nginx:alpine
可以看出,我们把registry和registry-ui两个容器链接到nginx容器中。
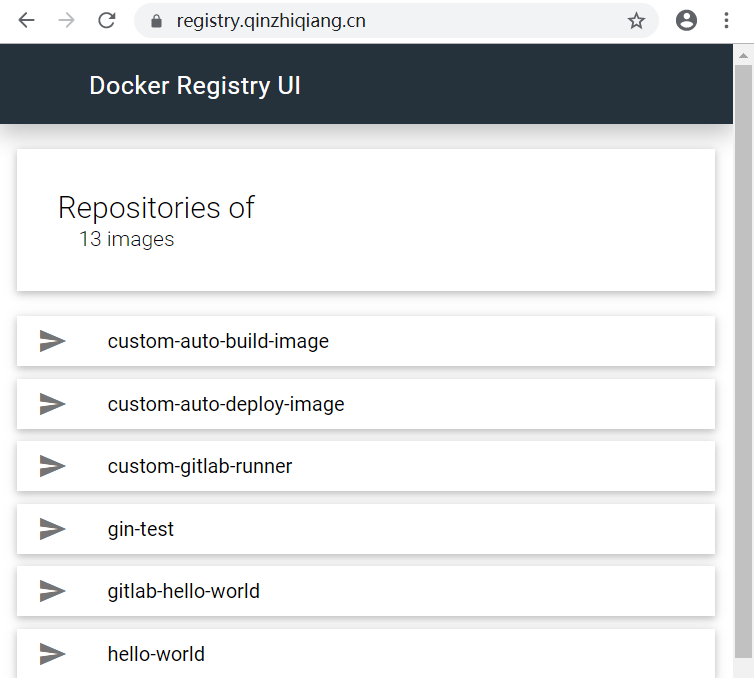
使用浏览器访问你的域名:
