React Native Android
以前使用Expo玩过React Native,只需把Expo APP安装,再扫二维码就可以运行自己编写的React Native程序,上手速度很快。但是,自己本来就想开发独立的Native APP,还需要寄生在Expo上才能运行,总感觉有点不爽。今天就使用React Native CLI + Android Studio自己构建APK的方式玩玩。
1. 准备环境
参考 https://reactnative.dev/docs/environment-setup 准备开发环境,需要安装的内容还是相当的多。安装完成之后,还需要配置环境变量。
- NodeJS、Python2、JDK
- Android Studio、 Android SDK、Android SDK Platform、Android Virtual Device
- Android SDK Platform 29,Intel x86 Atom_64 System Image
我的开发环境本来就准备了一些东西,如JDK 14、Android Studio 4、Python 3.7、NodeJS 12,只需要把Android SDK Platform 29与其Intel x86 Atom_64 System Image下载,并添加ADV “Default Pixel 3a API 29”。
2. 创建项目
-
执行
npx react-native init ReactNativeTSProject --template react-native-template-typescript命令,初始我们的项目ReactNativeTSProject。 -
运行项目:
cd ReactNativeTSProject
yarn react-native run-android
可以看到ADV启动,然后看到React Native样例。如果ADV启动比较慢,脚本会报错,待ADV准备完成之后,再执行一遍yarn react-native run-android即可.
3. 添加Counter组件
// Counter.tsx
import React, {useState} from 'react';
import {View, Button, Text, StyleSheet} from 'react-native';
import {Colors} from 'react-native/Libraries/NewAppScreen';

const Counter = () => {
  const [count, setCount] = useState(0);

  return (
    <View style={styles.row}>
      <Text style={styles.label}>Count: {count}</Text>
      <View style={styles.btn}>
        <Button
          color="#f194ff"
          title="DECREMENT"
          onPress={() => setCount(count - 1)}
        />
      </View>
      <View style={styles.btn}>
        <Button title="INCREMENT" onPress={() => setCount(count + 1)} />
      </View>
    </View>
  );
};

const styles = StyleSheet.create({
  row: {
    flexDirection: 'row',
    padding: 0,
  },
  label: {
    marginTop: 12,
    marginRight: 12,
    fontSize: 18,
    fontWeight: '400',
    color: Colors.dark,
  },
  btn: {
    width: 100,
    marginLeft: 12,
    marginRight: 12,
    marginTop: 6,
    fontSize: 18,
    fontWeight: '400',
  },
});

export default Counter;
在App.tsx添加如下代码:
<View style={styles.sectionContainer}>
    <Text style={styles.sectionTitle}>Counter</Text>
    <Counter />
</View>
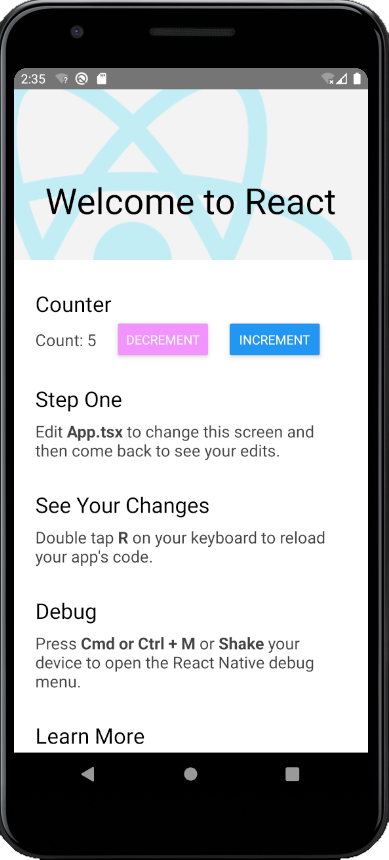
在Android模拟器中,看到我们想要的东西了:

4. 应用打包
本地开发时,React Native使用Hot Reloading机制实现JS动态加载。在发布应用时,我们需要把所有的资源都打包到应用安装包中。
在package.json中添加:
{
  "scripts": {
    "bundle-ios": "react-native bundle --entry-file index.js --platform ios --dev false --bundle-output ./ios/bundle/index.jsbundle --assets-dest ./ios/bundle",
    "bundle-android": "react-native bundle --entry-file index.js --platform android --dev false --bundle-output android/app/src/main/assets/index.android.bundle --assets-dest android/app/src/main/res"
  }
}
在Windows中,添加 bundle-app.bat :
@PATH=%PYTHON2_HOME%\Scripts\;%PYTHON_HOME%\;%PATH%

@mkdir android\app\src\main\assets
@cmd /C yarn bundle-android

cd android

@echo Gradle clean...
@cmd /C .\gradlew.bat clean

@echo Gradle assembleDebug...
@cmd /C .\gradlew.bat assembleDebug

@rem cmd /C .\gradlew.bat assembleRelease
@pause
这个例子只打包debug版本的APK。然后使用NodeJS的anywhere启动本机服务,
cd android\app\build\outputs\apk\debug
anywhere -p 8080
再到Android模拟器中下载app-debug.apk文件并安装,打开ReactNativeTSProject应用就可以看到我们的React Native界面。
5. 遇到的坑
- 我们需要API 29的ADV,如果本地有多个虚拟设备,需要把API 29的ADV改名到字母排序的第一个。否则,启动低版本API,可能会异常。
- JDK 14与默认的gradle-6.2有些不兼容,构建会失败。需要把
gradle-wrapper.properties中的内容改到gradle-6.5.1-all.zip。